mysemiorganizedlife

Just another WordPress.com site

Craft Closet Organization

Sometimes I look through blog posts or magazines and drool over playrooms–mainly because it allows kids bedrooms to be just bedrooms.  Our three bedroom house does require some creative use of those spaces, though.  The kiddo’s room doubles as her play room (just like mine did as a kid).  But, our spare room has a bit more of a multi-layered purpose.  It is my office, dressing room, craft center…and also our spare bedroom.  I have worked hard to keep these areas as separate as the small space can allow and as tidy and organized as possible, but as with everything I don’t maintain diligently, some areas get a little our of sorts.  One half of the closet is used as my craft/project space–and that is today’s culprit.

IMG_5960

Quite the mess to deal with…

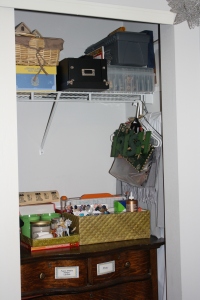
This part of the closet holds my many craft supplies–sewing box (in a grey tackle box), a button collection (in a scrapbook paper case), my camera, projects in need of being completed, gifts purchased for upcoming birthdays/celebrations/etc, and general craft supplies…

A view of the whole space.

A view of the whole shebang.

Below this messiness is a dresser that my mom used for me when I was a kid and I now use to hold my general craft supplies–including fabric, , jewelry, glue/adhesives, painting supplies, pipe cleaners, pom poms, feathers, scrapbook paper, and much more.  Each drawer has a purpose–and you can see the labels on them in this picture.

When I began, my biggest focus was getting the top of the dresser and the wire shelf under control.  The first step was to take everything out of the closet and place it on the bed.

Blank slate...

Blank slate…

Basket by basket, I started going through the items now spread out all over the bed.  What I soon discovered was that half of what was on the bed belonged either in the craft dresser, somewhere else in the house, or needed to be donated.  While I went through these items, I when to place things in the drawer and also realized I needed to go through the drawers as well.  For the most part the drawers were in good shape, but they did need a little attention.  Once everything that belonged elsewhere was eliminated, I took a good look at what was left and determined how best to add them back to the closet.

Wire shelf...

Wire shelf…

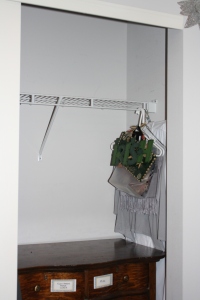
On the far right, the button box and sewing kit are stashed for easy accessibility. The black box holds items for gifts–empty jewelry boxes, padded envelopes, random gifts picked up along the way that have no intended recipient yet.  The yellow and lavender box is a memory box that holds mementos from over the years.  The basket on top of it has the makings for a fairy house kiddo and I will make soon.

Top of the dresser.

Top of the dresser.

The top of the dresser now holds my laminator and laminating sheets and paper cutter (located behind the wicker box).  The wicker box holds projects in progress–some are ones we are going to make and some are things that need fixed.  The top of the box just to the left has a place for note cards and gifts I know I will need very soon (this time for Mother’s day).  And just to the left of that, my camera bag.

I have that just purged and organized blissful feeling running through me right now.  I am hoping that with a place for everything…I will be able to keep this up long term.  The whole process only took about an hour, and I am thrilled with the results.  I now know for sure where everything is and have a good idea of what projects we need to get moving on.  While the tight quarters can be a pain at times, I feel like this small space will not work well.

The final product!

The final product!

Does anyone else have a creative use of a small space?

Leave a comment »

Happy Easter! A little breakfast fun

Just a quick note as we are having a lovely family day today. We usually have what we call “fancy breakfast” one day a week usually consisting of something “fancier” than cereal–pancakes, French toast, bacon or sausage, etc. Fancy just means mom gets to cook.

Kiddo LOVES getting special face pancakes on the rare occasion we eat breakfast out, and has been requesting them at home. The faces can be quite interesting depending on what is on hand.

This morning I had enough fruit to make a fun bunny face. (The eyes are yogurt covered raisins.). She loved it!
Definitely worth the couple minutes it took to throw together.

In the past I’ve used mandarin oranges or pecan halves for eyes or noses, bananas or sausages for a mouth, bacon for hair. Just grab whatever is handy that your kid likes and have fun–they for sure will!

Hope everyone has a Happy Easter!

20140420-092250.jpg

Leave a comment »

Lightening the Load–Or Cleaning Out My Purse

Sometimes I refer to myself as a bag lady…as in I leave the house with a handful of bags.  Always.  On school days, I leave with my purse, lunch bag, and work bag–and generally some sort of other bag full of things I am carting to and fro.  My daughter has her backpack and lunch bag and on occasion a bag of other stuff she needs to bring to school.  I swear, it feels like we are going on a long trip every time we leave the house!

And the most troublesome bag of all sometimes is my purse.  Since I became a mom, I have waffled back and forth between large bags and small bags.  I used to carry cute and whimsical purses that I could change on a whim because they only held a few items.  At one point in my life I only carried a man’s wallet in my back pocket.  But, with kids and age comes more stuff.  After trying multiple types and sizes of purses and a variety of ways to organize the things that go inside, I am still in search of a system that really works for me.  To that end, after frustration with things being lost in the depths of a bag I really, really wanted to love, I purchased a purse in a similar style, but with a shorter body and more structured bottom.  This step alone helped me stop wasting time fishing around for things.

But, I knew it wasn’t enough.  There was just too much in there!  Not only was it hard to keep clean and organized, but it was getting heavy.  I certainly don’t need added back pain because I have too much junk crammed into my purse.  So, one Sunday evening, I decided to treat my purse to some of my Top 7 step Organizing Tips

Here is a before picture of the purse contents…

1)  PURGE!  I went through everything and got rid of anything that was trash or didn’t actually belong in my purse.  It’s amazing how many things just get thrown into your purse because it is convenient.  My wallet got the most attention.  Man that little guy was stuffed to the gills!  Some of it was taken out and some moved to my ARC planner.

2) Think about where you will reach for things.  I looked at everything that I wanted to put back in the bag and really thought about where I go to look for said item.  Then I decided what would go into each compartment of the purse and gave everything a specific home.

Empty purse...  Where should everything go?

Empty purse… Where should everything go?

3) Use storage containers that make sense and fit your space.  I keep a small make-up bag of the extra stuff that can float around your purse and cause problems–lip balm, mini sewing kit, mini lint roller, dental floss, etc.  I added a few items to this bag that needed a better home.  I also ditched the little file folder I had been using to hold coupons (white with black details in the picture above).  It was just more added bulk that I didn’t need.  Instead, I added them to my ARC planner in one of the plastic sleeve thingies.  One thing that has made a huge difference for me over the years is adding a small metal clip to my keys which then fits nicely on the metal ring on my purse (I always buy purses with one of these for that reason).  If I always clip the keys to the ring, I will never lose them (which I do about 95% of the time and then kick myself when I don’t.)

5)  Make it visually appealing for you.  Pick a cute purse you will not get tired of quickly (But make sure it is also functional.  Sometimes those two things do not go hand in hand) and add items inside that make you smile.  The make up bag I use has a cute print, the wallet is a perky color, and I like the cover of my ARC planner (though I may pick out a new one someday just for fun).

7)  Realize you will probably make changes.  I know that this purse clean out will definitely help lessen the frustration when looking for items in my purse, but I also know in a few months I may reassess and make changes.  I am totally ok with that–because that is why I did the purse clean out in the first place.  What I was doing wasn’t working the way I needed it to and changes were necessary if I wanted to stop going GRRRR! every time I searched for something in my purse.

TaDa!  Here is my purse with all the contents back in place.  I have very happily been finding things over the last week, and I only think I’ve gone GRRR once or twice.

IMG_0074

Everything now has a dedicated pocket in which to reside.

IMG_0075

It’s amazing! It will actually close when it’s not stuffed to the gills!


1 Comment »

Frozen Cupcakes!

Huzzah!  We have survived and can wait another year before we have a friend birthday party!  It is always so much fun planning and having a party-but it is a bit stressful too.  Even though we picked a low key activity this year–watching a movie–making sure we had everything ready took planning.  The part my daughter loves the most is putting up the decorations and making cupcake creations.  This year, the theme was Frozen and we already had our thank you bags ready to go.  All the decorations and food were bought–and the night before we were ready to transform the house into a Frozen wonderland.

For this post, though, we are going to focus on one of my daughter’s favorite things.  Cake decorating.  She loves watching Cake Boss on Netflix and every week we load up Nerdy Nummies on YouTube (if your kids are into cake decorating, check out Rosanna Pansino’s channel.)

For her friends party, we always make homemade cupcakes.  This year, we decided to get fancy with the decorations.  They included printable Frozen picks, sparkly snow-like sprinkles, homemade butter cream frosting, blue chocolate pearls, and homemade chocolate snowflakes.  The night before the party, we baked the cupcakes.  We decided on blue cake and white frosting.  We took a white cake mix and added some blue food coloring.  We made 12 regular size cupcakes and about 16 mini cupcakes out of one box.  I found fun blue with white polka dot cupcake liners at Michael’s for $1.

IMG_5896

Decorating supplies…

Then, we made our chocolate snowflakes.  I also picked up some plastic squeeze bottles and chocolate melts (in light blue and white with sparkles) from the baking aisle at Michael’s.  We learned from Nerdy Nummies how to make chocolate decorations.  Print out the shape you want.  Tape down the paper to a flat surface (we used flat, flexi cutting boards).  Then tape wax paper on top.  Melt chocolate melts in a microwavable squeeze bottle (you’ll need more than you think) and then draw the shape using the bottle over the wax paper.  It sounds very simple, but this part was the biggest pain–mostly because one of our squeeze bottles was defective.  The chocolate kept squeezing out the size of the bottle instead of the tip (You will not see white snowflakes, because that was the problem bottle).  Grrrr.  But, we finally had some workable snowflakes from the blue bottle.  We popped them in the freezer to wait until morning.  The snowflakes were a bit fragile, but if handled carefully, they won’t break.  (And even if one of the little arms did break off, we could just put it back in place by pressing it into the frosting).

Our chocolate snowflake supplies.

Our chocolate snowflake supplies.

The next morning shortly before her party, we started decorating.  I’ve never made my own frosting, but I knew from past experience that trying to pipe the frosting that comes in the plastic can from the store baking aisle doesn’t work well.  It gets too warm from your hands and doesn’t really hold it’s shape.  So, to be safe, I bought a box of butter cream frosting mix from Michael’s with a 40% off coupon and prayed it wouldn’t let me down.  (Next time I think I’ll just try and make it from scratch).  Luckily, it made just enough to cover all our cupcakes.  We already had a set of Wilton tips and piping bags from some earlier cake decorating fun and just used the tip that looks sort of like a star.

Frosting supplies.

Frosting supplies.

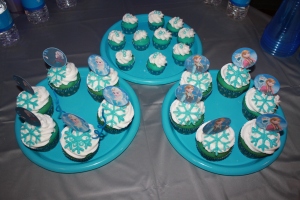
Once the frosting was piped, we sprinkled clear sprinkles on top of the big and mini cupcakes.  Then, we added chocolate snowflakes and Frozen pics to the tops of the big ones.  And, the mini ones were treated to some blue pearls.  They turned out pretty cute!  And, the best part is the kiddo had fun making them.

IMG_5907

Elsa cupcakes.  The one with the pearls was for the birthday girl.  She LOVES Elsa.

Elsa cupcakes. The one with the pearls was for the birthday girl. She LOVES Elsa.

IMG_5904

IMG_5905

Kiddo decorated these all by herself!

More Cupcakes!

More Cupcakes!

Lots of craft posts lately.  More organizing posts to come!  I already have one ready to write on the fascinating topic of cleaning out your purse…

Leave a comment »

April Fools Fun–“Cupcakes”

I saw this idea on Pinterest, and when my daughter asked what we were doing for April Fools day, I knew this was perfect.  As I’ve said in previous posts, my daughter is a cake decorating fanatic.  All you need to do is search Pinterst or Google and type in “April fools cupcake” and you will see a wide variety of options for this fun dinner item.

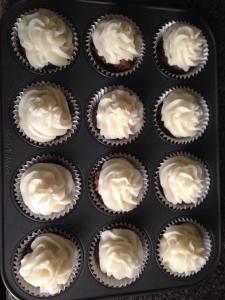
The cupcakes themselves are mini-meatloaves topped with mashed potato frosting.  The original picture I found had the potatoes dyed pink and purple–but I just couldn’t bring myself to do that.  So, we had plain old white “frosting.”  Kiddo was really surprised and thought it was a fun joke.  The only problem is that now, whenever I make meatloaf, I was told we need to make them the “fancy” way.  But she said not to worry, she will do the piping for me.

Cupcake

One of the fancy “cupcakes.”

april fools cupcakes

I did have to transfer the meat loafs to new paper liners after they baked, because there was a pool of drippings in each cup. Next time I will just do them in the tins without liners.


Leave a comment »