mysemiorganizedlife

Just another WordPress.com site

Kid Clothes: Older Kiddo=New System

As our daughter has grown, I have tried to adjust her responsibilities to fit with her age.  She’s almost six, and she really enjoys picking out her own clothes.  When she was in preschool, she was still pretty sleepy when we got ready  in the morning, so she rarely had input on what she was wearing each day (plus our preschool did fun themes ALOT and much of it involved wearing certain colors or clothes with shapes or letters on them, so many days we already knew what she was going to wear).  Now, I try to give her more input on her wardrobe.  We are halfway through our first year of elementary school, and I’ve learned a few things along the way on what works best for us when it comes to tackling the kiddo’s clothes.

1)  We started out the year picking outfits the night before for the next day.  This worked ok, but I thought it might be better if we did it for the whole week in advance (as I had seen other families do).  We tried it for a while, and it really didn’t work for us.  First, there really wasn’t anywhere to hang or store 5 days of outfits.  We don’t have room in the closet for a hanging organizer labeled for each day of the week, nor is there room on the hang bar.  Half of her closet is for clothes and the other half is for toys.  I did try a set of command hooks on the wall and that was just ok enough that we lived with it for a while.  The problem was I’d need more than two command hooks for five days worth of hangers, and I really didn’t want to take up any more wall space.  Plus, we live in a region of the country where what the weather forecast is on Sunday for the rest of the week can be drastically different by Wednesday.  So, many times we had to re-pick outfits.  I waffled back and forth, and finally did the smart thing.  I asked the kid.  She said she wanted to pick stuff out the night before.  So there we have it.  I did leave one command hook on the wall near her door to hang the next day’s outfit.  Nearby is her hair accessory holder and the little bucket that holds all of the rubber band bracelets she  we have made.  Picking out clothes the night before and hanging them on the wall seems to be the best route for us right now–but down the road that may change.

Here is where her outfit hangs for the next day...

Here is where her outfit hangs for the next day…

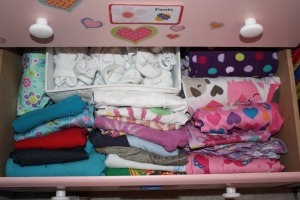
2.  Once we had the first problem figured out, I knew I needed to tackle the drawers in the kiddo’s dresser.  The dresser is not large, and as she has gotten bigger, so have the size and amount of her clothes.  We don’t rotate a bunch of seasonal items in the winter, because it can be -4 degrees one week and 65 degrees the next (I thought I might be exaggerating a bit here, but it was 65 degrees one day this week and -5 the next night!), and options are important.  So, the drawers are pretty crammed.  We were running into a problem that as kiddo put her clothes away, the piles inside would get messed up and we’d need to refold half the drawer.  Ugh.  And, it was really hard to see what was really in there–which meant she probably only wore about half her wardrobe (the stuff on top).  Then, one day a light bulb went off!  I had read and seen posts about the filing system for t-shirts in drawers for adults.  You could take an entire drawer and fit it in half the space.  My thought, why not for kids too?  And, why just shirts?  I had tried a filing system for the shirts, workout pants, and pjs I kept in bins in the top of one of our closets, and it worked pretty well.  So, I was fairly confident it would work for the kid too.  We’ve lived with the filing system for a few weeks now, and it has really made some big changes.  Not only do her clothes fit much easier into the drawers, but now when we go to select clothes for the next day, she can actually see everything that is clean when she makes her decision.  And, no more messy piles!  She was a little nervous at first about being able to put everything away herself, but with a little support the first few times, she now has the hang of it.  I highly recommend trying the filing system for you or your kids.  I say “BRAVO!” to the person who originally came up with it.  Here’s a look inside to see what our system looks like.  We have a drawer for shirts; one of pants, socks, and undies; and one for pajamas–which are all labeled so she knows where to put everything away on laundry day.
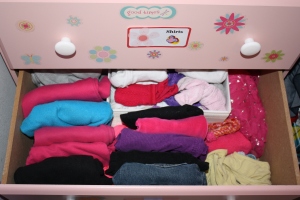
Shirt drawer.  From left to write the "columns" are sweatshirts, short sleeves, and long sleeves.

Shirt drawer. From left to write the “columns” are sweatshirts, short sleeves, and long sleeves.

IMG_5854

Fuzzy pants, Jeans and corduroys, undies and socks in a rectangular box from Ikea in the back next to her sparkle skirt.

PJs!  Pants, shirts, nightgowns and sets.  Plus a bin of extra socks in the back.

PJs! Pants, shirts, nightgowns and sets. Plus a bin of extra socks in the back.

Have you changed any of your systems as your kids have gotten older?  What have you chosen to help them be more independent?
Creativity Unleashed link party!

Leave a comment »

My 50th Blog Post! & A Little Craft

Holy Cow!  I made it to 50!  This is very exciting, and I just had to take a minute to write about it.  (Keep reading to see the little craft we did recently.)  I just wanted to take a second and reflect on this semi-milestone.  I started this blog almost 2 years ago (just shy by a month) as a way to keep myself accountable for the goals I’ve set and the processes I’ve put in place and as a record of projects I’ve done around the home and with my daughter.  And, really the purpose has stayed the same, but there are also some other reasons why I continue to write posts for this blog every week.

1)  It’s so much fun to look back and see how things have changed in the last two years (and I understand why the hubs says things are always changing–I’ve provided proof right here on this blog), but I think the changes are all for the better because we have changed too.  By writing down my thoughts and rationale for the changes I’ve made in how we I organize things and by sharing it with folks out in the blog world, I think I have been more mindful about what I am doing instead of just attacking areas willy-nilly.

2)  Seeing the pictures and projects we have done provide a different way to walk down memory lane on what has occurred in our lives over the years and how my daughter has grown in that short amount of time–and how I have grown as a mom and person.

3)  Sharing my blog with others is quite fun.  I never intended to make this blog into a full-time or even part-time job (which it isn’t even close to either of those.  No money made here folks), but I always thought it would be fun to have others read it.  Thank you to all of you other bloggers out there and link parties! (especially Jen at I Heart Organizing and Jessi at Practically Functional). I discovered the power of those parties this year and how they can gain exposure for your blog.  Looking at my stats and seeing where people are visiting from, what posts get the most views, and the originating site is actually pretty cool.  In no other way could I have communicated this part of me with people all over the world.  So thank you to anyone and everyone who has ever stopped by and given my blog a chance.  How cool is it that we live in an age where this is possible!  Oh, and, when I first realized someone had pinned one of my posts on Pinterest I was pretty giddy–I even showed my husband right away.  I totally geeked out!–and pretty much did the same thing when I saw a second pin.  It is so cool people are reading this blog and like what has been posted enough to pin it and share with others.  Thank you so much to those of you out there both reading and sharing my projects and thoughts with others, and I am so glad you found something that spoke to you!

I’ve enjoyed writing about my semi-organized life, and I hope any visitors have enjoyed stopping by and have maybe even picked up some inspiration for projects in their own lives.  I know my inspiration comes from other bloggers quite a bit of the time–so thank you to everyone out there who blogs for sharing your story with all of us and for giving me the inspiration to share my own journey with others.

Now for our little craft!

I had a collection of various mason jars sitting in my kitchen that migrated between the top of my kitchen sink and under the kitchen sink.  I knew I wanted to do something with them, but I wasn’t sure quite what.  I think the mason jars are super cool, and I really wanted to showcase all of the details like the fruit and writing, but how to do so…  I thought about adding colorful beads or rice or water to the inside–and then thought about having 2 rambunctious cats and 1 slightly clumsy five-year-old and vetoed those ideas.  So, I did what most folks do these day, I surfed around on Pinterest looking for mason jar crafts until I found something I liked, was easy to do, and I could get the kiddo involved in helping.  And, of course, Pinterest delivered.

Over at http://www.craftberrybush.com there is a tutorial on how to DIY blue glass mason jars.  Basically, you tint your mason jar a color.  This was perfect!  It could hi-lite all the cool parts of the mason jars without the hazard of something possibly being spilled.  Plus, the instructions were super super simple.  But, I did my research and looked around at other blogs to see how they tinted their mason jars.  Most described a process that involved Modge Podge Gloss and baking in the oven.  (FYI–I just went to the Modge Podge website and right at the top is an announcement that it will be soon available in sheer colors at Michael’s and has a line of colored glass mason jars at the top…  I guess they read blogs too :).  I didn’t have the special gloss version of Modge Podge (and didn’t really relish a trip to the store), and there seemed to be quite a few steps the kiddo couldn’t do in this version.  So, we stuck with the simpler http://www.craftberrybush.com version.

Our working space.  We painted the jars on disposable plates for easy cleanup.

Our working space. We painted the jars on disposable plates for easy cleanup.

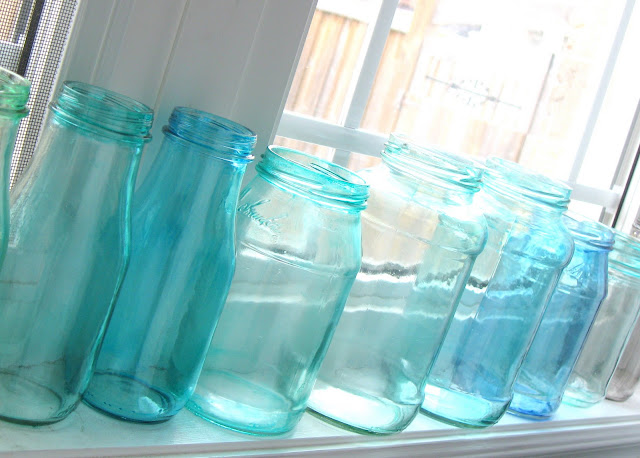
We had just finished up the major bedroom painting project, and kiddo was very sad she couldn’t help, so this project let her be involved in painting something-which was wonderful!  Basically, what we did was take regular white school glue (about 1 tsp), a few drops of water, and about 3-4 drops of food coloring.  We wanted some color variety, so we went with teal, purple, orange, and pink instead of just blue.  Once the 3 ingredients were mixed inside of a small disposable plastic cup, we took sponge brushes and painted the outside of the jars.  Kiddo painted a small mason jar (orange) and a jelly jar (pink to keep in her room).  I did the large (teal) jar and the medium size (purple) jar.  What I discovered is that the mixture goes on very easily, but you need to be sure to pull the sponge brush from top to bottom to eliminate blotchiness.  Also, if you want to get into the crevices of the words or pictures, just squish the end of your brush into the grooves and then even out with the top to bottom method.  I found we really only needed one coat for each jar.  I did go back over my daughter’s jars while they were still wet in any places where the mixture was uneven.  They dried very quickly, and turned out a little streaky (which I actually like).  I also love that if you need to start over or change your mind about wanting the jar colored, all you have to do is wash the outside! And, I can always seal the outside if I see fit to keep it more protected.

Up close and personal...  How it looked after the short dry time.

Up close and personal… How it looked after the short dry time.

Right now these are proudly displayed on a table in our living room and are empty.  I think I would like to add some flame-less candles to them for a bit of fun sometime down the road.  All in all, these was a very quick project we could complete with items on hand, that cost no extra money, and was done in less than 1/2 an hour.  Total winner project for mom and kiddo!

Proudly on display!

Proudly on display!


Leave a comment »

What I Learned While Painting My Bedroom

We moved into a freshly built starter type home shortly after we were married.  As such, the entire house was painted the same light gray color throughout in a quality of paint I would guess is one step above builder grade.  We haven’t done  a whole lot of painting ourselves over the years, just our two bathrooms and the kiddo’s room (twice).  The vaulted ceilings in our living room are best left up to the professionals in my opinion.  But, we decided a few months ago that we’d like to paint our master bedroom–and finally found time to get it done over winter break.  In a little over 24 hours our bedroom was transformed with just a couple gallons of paint, and I learned a few lessons along the way.

1)  Ceiling paint cures over time.

We had been living just fine with the generic paint color in our room for ages, but due to some very minor repair work we needed to do to one wall we needed to spray a little texturizer on the ceiling.  In case you didn’t know this (which I sure did not) the paint on the ceiling cures over time.  What this means is that you are not able to go back and touch up the ceiling paint, because the color will not match.  Therefore, you have to repaint the entire ceiling.  We experienced this problem in the kiddo’s room the second time we painted it too when a little bit of the lavender got on the ceiling–her ceiling needs repainted too, but that’s for another day.

2)  Invest in a nice quality paint.

While the majority of our house is a  nice neutral color, the paint does show marks very easily and requires touch ups a few times a year.  I’ve gotten very good at making the whole house look freshly painted, but is kind of a pain in the rear.  In the few rooms we have painted, we have chosen to use Behr paint, and oh my what a difference. Not only is the new paint a semi-gloss instead of flat, you can see and feel a difference instantly.  I’m not sure how to describe it other than it looks creamier and feels smooth and does not show every little tiny mark.  Plus, nicer paint requires fewer coats.  We learned this in kiddo’s room.  The first time we painted it it took an entire gallon (down to the last drippy drop).  The second time it only took about 1/2 a gallon–because the walls weren’t soaking half of it up.  Below you will see the color we chose for our bedroom.  LOVE IT!

Dark Storm Cloud by Behr– http://www.homedepot.com

3)  Quality tape is key.

One might think that painter’s tape is painter’s tape–at least I did.  I was proved wrong this time around.  We used the standard blue painter’s tape around the majority of the room, including 75% of the ceiling.  But, then my blue tape ran out, I had to turn to the green Frog painter’s tape that I use to hang up items around the house.  (The green tape has a bit more stickiness to it, and it will adhere posters and things to the kiddo’s walls where the blue stuff would just fall off.  Also using painter’s tape instead of pins is a great trick to avoid holes in your walls.  I use it at home and at work when I don’t want to compromise the wall).  Anywho…  The green tape went up on half of two walls.  When we took the tape down, the lines left around the green tape were nice and crisp.  The ones under the blue had some seepage.  This may be mostly to do with the texturized walls in our home, but I think would apply to smooth walls too.  In the future if we need to paint a room again, we will definitely use the green tape around the ceiling.

4)  Holy buckets of dust and cat hair.

Let’s be honest here, I don’t think most people move their dressers or beds on a regular basis to clean underneath or behind them.  We for sure didn’t.  And, let me tell you it showed.  We have a few electronics in our room (a tv and dvd player that really only get used for movies with the kiddo and occasionally when the hubs is watching something on YouTube.  It’s used enough to warrant keeping it in the bedroom but not enough to be a distraction from sleeping or my reading habit).  Apparently these bad boys attract a lot of dust along the baseboards between the dresser and wall.  YUCK!  And, evidently two longish haired cats leave hair build up everywhere including on windowsills they don’t sit on and along closet baseboards–and of course under the bed.  Even dusting and vacuuming once a week didn’t help those hard to see areas.  I’m seriously contemplating adding vacuuming under and around bedroom furniture to my spring and fall cleaning lists.  Does anyone move major furniture in their house to vacuum?  If so, how often do you do it?

Our longest haired kitty (and a view of a light gray wall behind him).

Our longest haired kitty (and a view of a light gray wall behind him).

5)  Five-year-olds have more patience than you think they do.

Of course the kiddo wanted to help in the whole process, but little hands and dark paint + light carpet = recipe for disaster.  So, while mom and dad painted for a large chunk of time, she was left to figure out how to entertain herself–which quite honestly she needs to do more of.  And, guess what.  She did it!  She came in to check on us every once in a while and ended up helping in the tape removal process, but for the most part she was able to play on her own while we painted with the door shut (because our youngest kitty is just a bit too curious for his own good).  Of course we checked on her and she checked on us, but for the most part she was super patient which I was so surprised and impressed with.

6)  It’s amazing how a newly painted room makes you feel!

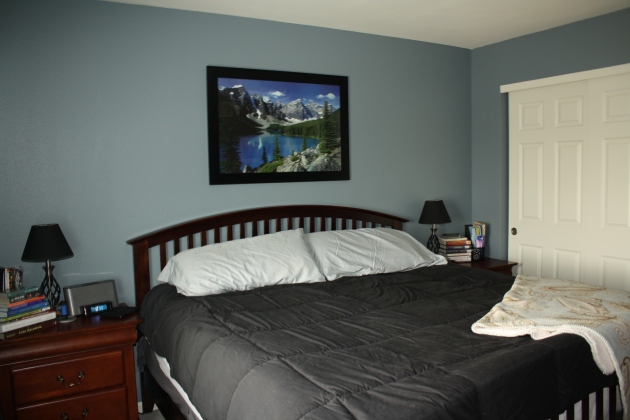
Like I said, we really haven’t painted all that much in our house (mainly rooms on the upper floor) and it has been a while since we’ve done one that I use on a daily basis.  All I can say is WOW, what a difference!  We chose a blue-gray color that didn’t clash too much with the charcoal gray in our master bathroom.  We weren’t entirely sure what it would look like once on the walls, but I am in love.  We wanted something that wasn’t a flat gray, and I love that the blue comes through in the color quite nicely.  And it really looks wonderful with our cherry wood furniture–which I hadn’t expected.  Also, the artwork we have on our wall (photos I’ve taken matted in white with thin black frames or in thick black frames like below) really pops!  Kind of crazy how painting one room can make your home feel new again.  Check out the before and after below…

Before picture.  This is our room with the light gray walls.

Before picture. This is our room with the light gray walls.

After!  We love the way the room looks now.  This picture doesn't do the color justice, but you can definitely see a difference in the before and after.

After! We love the way the room looks now. This picture doesn’t do the color justice, but you can definitely see a difference in the before and after.

Anyone else tackle any major projects over the winter holidays or make any painting changes recently they are in love with?

1 Comment »

My Favorites from 2013

Over the last few days, I have been working on one of my resolutions to break out of my rut of just reading the same blogs or websites and explore new inspiration.  It has been SO MUCH FUN!  I will share in a later post (or maybe on a sidebar) who has become a new favorite.  But for now, one thing I noticed people doing was posting their greatest hits of 2013.  While I could post what seemed to get the most traffic on this blog, I would be limiting myself to things I actually linked up to other blogs.  So, I decided to post my favorite projects from 2013!  In no particular order, here we go!

There is no picture to go with this post, but I think it is the perfect one to start with.  It is titled “Organization is HARD!” which it truly is for many people, even semi-organized people like me.  I sometimes feel like I have finally got everything together and then life sends me a little whammy wake-up call.  Case in point, I was trying to work ahead on teacher gifts from the kiddo and coworker gifts from me and wrote out these cards to hang on the gifts the day before so we could just go after it the night we planned to put them all together.  The next evening, after 20 minutes of looking, I gave up and wrote out new cards.  Two days later I found them.  UGH!  Lesson learned, put the stuff where you are going to look for it.

After reading tons of blog posts, visiting sites from Pinterest, consuming about 15 organizational books last spring, and from life experience in general, I came up with my Top 7 Organizing Tips.  Putting stuff where you are most likely to find it is one of the top 7.  I should have listened to my own advice when doing the gift tags.

New Desk Space

New Desk Space

Another big change for me this year was an addition of an office space for me in our guest bedroom.  My hubby bought me a new desk for my b-day, and I have been able to do work from home and all my other creative projects in style ever since.  Most of the desk organization has stayed the same.  The only big-ish change is that the magazine holders have been moved to my new closet space to make room for our household wireless printer.  (I was told I get to be the keeper of the printer, because I print more stuff.  Very true, and it keeps me from running down three flights of stairs every time I print something.  And yes, even though there are 3 sets of stairs, our house is still fairly small.  Go figure.)

IMG_5238

Another fun project was organizing the bathroom I use to get ready in the morning and share with my little one.  Just finding the right stuff to store everything was a challenge (especially because I didn’t want to spend much money), but I loved how it looked after all the labels were added.

All the drawers happily organized and each with a purpose.

All the drawers happily organized and each with a purpose.

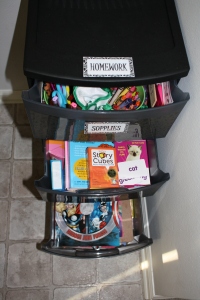
One of the biggest challenges in a smaller home is storage for all of your kid stuff (and we only have one!).  I talked about controlling the kid clutter that seems to permeate every room of our house and also how I tackled some storage problems related to homework/learning center in our eat-in kitchen.  It’s funny to look back on some of these posts because I realized that I have made some pretty big changes since I last wrote about some of these spaces.  For example, in my daughter’s room, we needed to make space for a collapse-able barbie house (which has never actually been collapsed), so the storage cubes have been moved back to the closet for now.  And, her bookshelves now house books on the bottom and toys she wants to make time to play with on the first shelf and the top surface.

My new clothes closet.  Everything fits and It actually is better this way!  The other side of the closet holds my craft dresser and on the wire racks above are some of my other craft/girl scout items.

My new clothes closet. Everything fits and It actually is better this way! The other side of the closet holds my craft dresser and on the wire racks above are some of my other craft/girl scout items.

Another huge change that has made a difference for us is switching how we organize the closets in our master and spare bedroom.  Now all of hubby’s belongings are in the master, and my clothes, shoes, craft stuff, etc. are in the spare room closet where my desk lives.  What a logical change that I should have totally made sooner.  It has worked so well for us already!  This post also covers our storage closet and the drop zone of the kiddo after school.  I also tackled some of our problem drawers this fall and am very happy with the results.  I am still loving the wrapping paper lining the bottom of my nightstand.

And finally, I worked on organizing my calendars and to-do lists.  Mainly I had trouble because I had too many of them–between paper and electronic I couldn’t keep track of what I needed to keep track of.  Thanks to Google Calendar and a few list making apps, I have been able to keep things more together the last few months.  And sometimes I need all the help I can get.

There you have it folks!  My favorites of 2013!  As I mentioned earlier, it’s funny to look back on some of these things and realize that I have already made changes to those systems I wrote about.  One of my Top 7 Tips is to realize when something isn’t working and feel ok about going back and fixing it.  I have that one down!  In the next few weeks, you’ll hear from me on a couple of areas in particular that I have revisited and realized needed some work (one of my 2014 goals! yeah!!).  I am sure there will be more to come as I revisit old projects and start new ones.

Has anyone else had a project they thought was finished and then a few months or more down the line you realized maybe needed a bit of tweaking?

Creativity Unleashed link party!

link party palooza banner

Leave a comment »