mysemiorganizedlife

Just another WordPress.com site

Conquering Kid Chaos

Do you feel like toys are slowly taking over your home?  Do you wonder where in the world your floor went some days as you survey the amazing mass of stuff that your child or children have strewn about?  How do you contain all that toy clutter?  Do you wonder why your child has infinitely more toys at a young age than you ever did as a child?  How do you contain the kid created chaos?  (Be patient–there are pics at the bottom! Or just take a gander and scroll back up to read all about them).

I am going to qualify this post with one statement:  I still very regularly feel like toys have taken over my life home.  But, I have tried to instill some practices in my daughter and myself–some we do better with than others–to help contain the chaos.  I have three general strategies I try to abide by to keep our house from looking like a mini version of Toys R Us.

1)       Purge.  You may remember this from my 7 Organization strategies post.  As with any organization plan, I firmly believe the less you have the easier it is to be organized.  My daughter and I do this very frequently, and since she was about three she has been very involved in the process.  Before Christmas and her birthday we go through the toys in her room (and other areas of the house) and decide what she actually plays with and what can move on to another child that will get more fun from it than she does.  I try to guide her when I can and even give her a choice, like pick one of these to keep and one to give away.  Beginning this at a young age has helped greatly, because she is very used to the process, but you can probably start this at any age—just be sure to involve your kids.  Another reason why toy give aways have been successful for us is that we always have a pre-determined destination for the items.  Sometimes we pick out things to give to specific friends (we even went on a secret adventure one evening and left stuffed animals in several friends’ mailboxes).  Other times, we select items to donate to the local children’s hospital.  Most recently, a friend of ours had a family member experience a fire that destroyed their home, and they lost everything.  We discussed the issue with my daughter and asked her to pick out toys, books, and stuffed animals to give to the two little kids who had lost everything.  She easily agreed and donated an overflowing large milk crate of her belongings to these two little ones she has never met, and probably never will—and didn’t even bat an eye about it.  I am so proud of her for that and happy that our little system has helped her see the importance of giving to others.

To sum up:  Toys are toys.  Kids outgrow them, and you cannot keep them forever.  Keep the really, really precious ones and find a worthy cause or close family member or friend to pass the other well loved items on to so the fun can continue (Did you see Toy Story 3?).  P.S.  I also feel this way about clothes.  You can see how we saved our daughter’s baby clothes that didn’t include traditional storage.

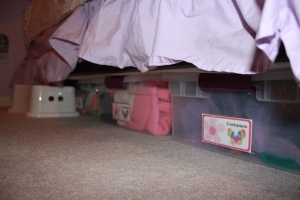
2)       Contain.  Once you’ve purged down to a reasonable amount, find ways to contain the toy chaos in bins, under bed storage, closet systems, whatever works best for your home.  And then LABEL the areas so your child can learn to put the toys back all by themselves.  When they are younger it may be best to help a bit in this process as it can sometimes be a bit overwhelming (and probably a lot boring) for kids to do on their own—so they may just quit.   Plus, by leading by example, you show your kids exactly what a “clean” room should look like—that way, when they’re older, you can realistically expect them to create “clean” on their own.  I decided to use a combination of picture and word labels as my daughter is still learning to read—the pictures help her know what really goes there and the text helps her learn another sight word.  In my daughter’s room, we have a cube cubby system set up for her toys in the main part of her room, some under bed storage, and a set of bookshelves to hold books and Lego projects in her closet.  We won’t have a play room, so her toys are house in her room and in our living/family rooms.  In the main part of the house, we have more Legos organized by color in plastic pull out drawer compartments, puzzles and games contained in cubes and baskets, and art supplies in boxes in our pantry (this may seem odd but makes the most sense for us, because we do our art projects at our kitchen table).  Almost all of these are labeled clearly, so we know where everything belongs at the end of our play time.

3)      5 Minute Pick Up.  Purging and containing will help with overall organization, but daily maintenance is important too.  Part of my daughter’s daily routine is a 5 minute pick up.  We even added it to her chore chart to make sure we know to do it every day. Check our her chore chart here Quick pick ups help make sure anything left out in any room of the house is put where it belongs before lights out.  I do a longer 10 minute version of this before I go to bed for non kiddo items, but having her help with her own stuff drastically cuts my time down and helps her learn some responsibility.  I am going to confess that I drop the ball on this sometimes, because I am just too plain tired to deal with it, but we try to pick up where we left off the next night.  I am hoping to do much better with this before school starts.  They say a habit forms after 21 days.  Here is to day #1!  In addition to this, try and instill the “don’t get a new thing out until the old thing is put away” process which will in turn cut down on the amount of time needed for the end of night pick up routine.

4)       An additional step is possible.  If you find your kid or kids have way too much stuff—cut down on what is given to them for holidays or by you throughout the year.  See if people could purchase memberships to the Children’s Museum or Zoo as a gift for your family or take your children out on special outings instead of getting more stuff.  One thing I’ve seen out in blog land is to give one thing they want, one thing they need, and one thing to wear.  Again, do whatever works best for you and your family.  I know this is one area I am trying to do better with in our house.  One way I tried was to suggest to people to give items to my daughter that encouraged her to play with toys she already has—like Barbie clothes or furniture or Build A Bear accessories.  For the most part that was pretty successful.  Even though we added more stuff in the process, she now actually plays with both more than she did before which I think makes it worth it in the long run.

Does my daughter’s room look immaculate every day?  No.  Do I sometimes have random, very messing looking projects (all of my daughter’s stuffed animals and baby blankets) spread out on my living room floor for a day or two?  Yes.  Our house doesn’t look like a magazine cover shoot every single day—and I’m ok with that.  That’s impossible and blocks some great creative play.  I hope to strike a happy medium.  My daughter gets to have fun, use her imagination, and play…but everything has a home where it belongs and she learns lifelong skills to keep herself organized.

I am always on the look out for great tips for how to incorporate kids toys into a small bedroom—and a house without a playroom.  So, if you have any great suggestions or know of any great blogs to check out on the topic, let me know!

Here is our cube storage area.  This is an old wire system my husband had and ITSO boxes from target and other boxes from Ikea.  I like the two toned look.

Here is our cube storage area. This is an old wire system my husband had and ITSO boxes from target and other boxes from Ikea. I like the two toned look.  These labels are held on with removable Velcro dots.
IMG_5281

Even the under bed storage gets fun labels! I’ve used the same pattern for all of her labels in the house–from her room, to the art supplies in the pantry, and even for her coat and backpack area in our hall closet. (The bed skirt is tucked up a bit to show off the storage–normally it covers the boxes.)
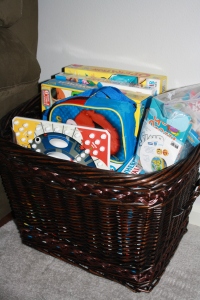
Our kids game basket.  It's located in our living room sort of tucked away but still easy to access.

Our kids game basket. It’s located in our living room sort of tucked away but still easy to access.

IMG_5286

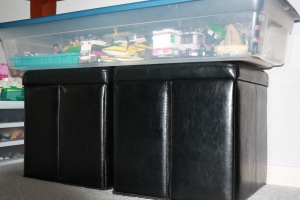
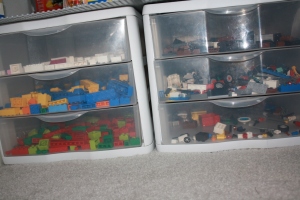
Small drawer system for Lego pieces and a large bin to hold all of the vehicles and creations.  One black bin holds Lego instruction books and the other holds puzzles.  These are in our living room and easy to access during play time.

Small drawer system for Lego pieces and a large bin to hold all of the vehicles and other creations. One black bin holds Lego instruction books and the other holds puzzles. These are in our living room for easy to access during play time.


2 Comments »

My Top 7 Organizing Tips

Want to start getting organized–or want to become more organized?  After reading a ton of organization books over the last year, attending an organization seminar this summer, and living through my own organization journey, I have come up with these Top 7 Tips.

1) PURGE–be realistic.  What do you actually need/use.  Donate what you can (though you may not be able to with some products), throw away what is broken or damaged, and put misplaced items where they truly belong (especially if it is in another room).  For sentimental items, figure out why they are sentimental.  Can you take a picture of the it and hold onto that memory just as well, would someone else love it more than you, are you keeping it out of obligation?  A yes to any of these questions means let it go.  Do you or someone in your house use it frequently or love it dearly?  If yes, keep it, but find a way to organize it better so it doesn’t cause you stress.  Some people call this de-cluttering.  I like the word purge–because it helps you eliminate and cleanse your space opening it up to new possibilities.  (Eliminate and cleanse are both synonyms for purge…)

2) Think about where you are most likely to reach for/use items…and put them there.  Seems logical, but that’s not always what we do.  We put it where it might look best, but not where it would work best.  If you find yourself constantly looking for things, you are losing valuable time every day.  Place items where they make the most sense and make sure they get back there each and every time.

3)  Use storage containers that make sense and fit your space.  Do not buy everything you think you need right away.  Chances are you’ll end up returning something (or in my case reusing it somewhere else).  For that matter, before you run out and buy something, look around your house to see what you already own that you could possibly re-purpose.  If you do need to buy something, do some research to check out the possibilities first–buying on a whim can create more clutter and stress.  And be sure to measure!  You want containers that will fit.

4)  Use labels when you can.  This helps you (and your family) get things back to their home location (which you established in step 2).  If you don’t have a laminator or label maker–no problem.  Print out or hand write your label and use clear box tape as your laminate.  Or buy sticky labels from the store to write on or run through your printer.

5)  Make it visually appealing for you.  Having a pretty space can help relax you and lower stress.  It is much more pleasant to cook, get ready in the morning, or do paper work in a pretty space than a drab one–and an organized, uncluttered one for that matter.  At least I think so.

6)  Do not get overwhelmed.  You will not be able to organize your whole life in one day, week, or month.  Organization is a process that takes time, but does not have to be time consuming.  Many people don’t have an entire day to devote to organizing a room of their house, but they might be able to find 15 minutes each day to tackle one part of one room.  For example, break your kitchen up into sections (pantry, lower cabinets, upper cabinets, drawers, fridge, etc.) or your bedroom into sections (dresser, closet top, closet bottom, night stand, under bed, etc.).  Once you’ve finished everything in one room, move onto another.  I’ve heard tackling the most annoying problem area first is best, but I’ve also heard getting easier tasks out of the way is better, both for the same reason.  They give you a sense of accomplishment.  Pick which one you think would be best for YOU and go with it.  Once you have finished a room or space, move on to the next.  But, have a plan.  Decide what order to do things in and when–schedule it in your calendar if you need to.  By having a plan, you are more likely to finish your project, because you know exactly what you want to accomplish in that space and will not wander around from room to room only partially starting/finishing things.

7)  Realize that you will probably make changes.  It can take multiple tries to get something the way it will work best.  Chances are you may still make small changes as you get older and your life changes.  Be open to that possibility.  And, if something isn’t working the way you thought it would, change it.  So the organizational tool/system you thought would work best didn’t.  Big deal.  Do not think of this as a failure.  You’re just implementing system 2.0.  Don’t be afraid to try again!  You know more now than you did the first time and chances are you’ll get it closer to right this next time.  Plus, I’ve found that organization is fluid process that is never truly “done,” because our lives are changing all the time and our systems should therefore change too.

Some of the books I read about organization include: (coming soon!)

4 Comments »

Bathroom Organization

The space under the bathroom sinks have irked me somewhat for years.  It seems like this small space is used to house so many items–some used everyday and some used less frequently.  In our house, there really is nowhere else to store the “extras” that you need in the bathroom from time to time, so under or on the sink is it as far as where to organize all these products and gadgets.  I will freely admit that this is probably the space in my house that I have reorganized the most.  I just never could find a way to make it work without something feeling out of place or in the way.  After many years, I think I have finally figured out a system that works really well for me.  While I don’t have any before pictures to share, I can give a few details on how my organizational plan came about.  The first bathroom I talk about is where where I do all of my daily routines and is also my daughter’s bathroom, so I had to work around both of our needs.

IMG_5245

1)  Purge.  I am the worst about this for bathroom related items.  Too many times I have found I will hold onto some sort of product or gadget because I may need or use it someday.  I am not this way in any other part of my life, so I’m not sure why I am this way with beauty related products.  I found myself with eye shadow I never used–ever–but held onto with the hopes I might someday, even though I had a brand/color I preferred much more.  I would hold onto half empty shampoo bottles, even if they didn’t work that great for my hair type.  Finally, I realized I needed to let go of these things.  Yes, I spent money on them, but I wasn’t using them and they were taking up valuable space.  Over several months/years, I finally got myself down to the essentials that I actually like using.  I have learned not to go the cheap route on products and to buy those that I have used before that I really do think work best for me–even if they are a little bit more expensive.  I may spend a little more upfront, but I am also not wasting money on things I will never use and will just take up space under my sink.  This seems to be an ongoing process with me.  I again went through my makeup a few months ago, and just the other day I purged some very old bottles of nail polish.  Hopefully, that’s the last of the Great not so great Product Purge!

2)  Prioritize.  I am out of sight, out of mind kind of gal when it comes to my routines—which is why I have a chore chart and to do list.  I never thought that really applied to my beauty/health routines.  But, not so amazingly, it does.  If I cannot see a product (like face wash) or it is difficult to get to (meaning it is hidden by a cabinet door), I am less likely to use it when I need to.  My brain is usually cluttered with other things, so a visual reminder is always best for me—even in the bathroom.  Some people prefer nothing on their counter tops–I don’t mind items out as long as they are contained and look nice.

I didn’t realize how much I needed my products out and visible until I made a small change to the counter top.  While on an amazing vacation with my husband, we stayed in a nice hotel that had a mirrored oval shaped container on top of the vanity to hold a lady’s beauty supplies.  I thought it was so lovely that when I got home, I wanted to duplicate the feeling in my bathroom.  It took me a while to find something I thought looked fancy enough, and I ended up stumbling upon it.  My grandmother gave me a silver rectangular candle tray, and I thought it would be perfect—and it was until the silver started to tarnish and get weird from all the moisture in the bathroom.  Out it went.  While I originally wanted the “look” of the fancy hotel, I realized it was the convenience of having products handy that really did it for me, so losing the silver tray was not a huge blow.

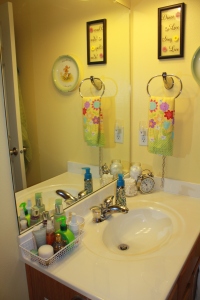
Wire basket housing everyday essentials.

Wire basket housing everyday essentials.

While not as swanky, the white wire basket I use now fits the purpose just as well and won’t get damaged.  I still have my eyes on the lookout for something prettier just in case, though.  In my little basket I have some of my everyday items like face wash, moisturizer, perfume, hair tamer, etc.  I can easily get to all of these items, and they look sort of pretty all lined up together.  I found the little bowl at a local grocery store and thought it would be perfect to hold some of my smaller jewelry items like rings and bracelets.

Pretty containers help the space feel more fun to use.

Pretty containers help the space feel more fun to use.

On the other side of my counter top, I added a few glass jars to hold two other essentials—cotton balls and q-tips.  It’s amazing how much more frequently you use these items when you don’t have to dig under your bathroom sink to find them!  Plus, I love the way they look sort of shiny and pretty on their own—even if one of them is an old pasta sauce jar.  I also love the pretty silver soap holder from Bath and Body Works.  They are so cool!  I’ve wanted something decorative like that for years. It’s like they read my mind.

IMG_5239

3) Corral the Under Sink Chaos.  I don’t know why, but under the sink always seemed to be a jungle of confusion.  No matter how many containers I tried or organizational systems I implemented, this just always seemed out of sync (bad pun, I know).  Finally, I think I have it all figured out.  Again, purging was a HUGE help.  The next thing that made a major difference was finding the right containers—and, facing them in a direction that makes sense.  What you see under my sink now is what I’ve lived with for a few months now—and about the 17th update to my under sink area.  The pictures show how it actually looks—not all dolled up and perfect.  The baskets are there so I can get things in the right zone—even if they are not perfectly arranged.

IMG_5238

The tall silver drawer system is from Bed Bath and Beyond.  I purchased it in hopes that it could help make better use of the horizontal and vertical space under the cabinet—and it has worked beautifully.  It actually holds quite a bit and is fairly sturdy.  The top is used to hold all my “extra” items—like a new pack of eye shadow or a new bottle of moisturizer that isn’t needed quite yet.  The bottom holds some items for my “health”—like large vitamin bottles, hydrogen peroxide, band-aids, etc.  The plastic shoe box next to it holds all the items I use every day that don’t go in the wire basket on the counter top—like my make-up bag, hair gel, lotion, kiddo’s detangling spray, etc.  The two plastic boxes next to it I’ve had for years and still work really well to hold less frequently used “hair” items like my hair dryer and curling iron and “nail” items like my bag of polish and bottle of remover.  For some reason, I had these facing sideways—one behind the other—and they work so much better side by side instead (see pic above).

My jewelry organized inside the cabinet door in my bathroom.  I even have room to add two more hooks if I need too down the road.

Update–More hooks and jewelry here now.

My jewelry I keep on command hooks inside the door to the hair/nail items and the other cabinet door features command hooks that hold my daughter’s water mug and washcloth she uses whenever she brushes her teeth.  I do have two small drawers above the cabinets that house more every day items.  The one on the left has our toothbrushes-paste-and floss, my small vitamin container, and nail clippers and files.  The one on the right has hair items like combs, barrettes, clippies, etc.  This drawer still gets a little messy, and I’m looking to add another small basket or two to it to keep the different hair items separated.  Right now, they get a bit jumbled.

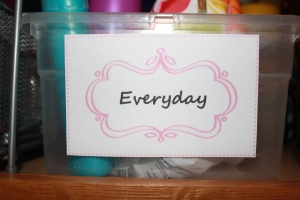
4) Labels.  Why label everything under the sink?  Why not?  First off, I like that all of the various containers now have a uniform look with the labels.  And, they are sort of stylish and pretty.  Second, it keeps me honest.  I am much less likely to just throw something under the sink if a label tells me it has a specific home to go back to—mainly because I have given it a specific home and thought about the best place for it to live.  I used painter’s tape (such a great tool) to attach the labels to the plastic boxes, but it kept falling off the metal baskets.  To solve that problem, I just took some white thread and poked very tiny holes in the front of the label on both sides (with a sewing needle) and tide them to the wire basket—which has worked very wells so far.

I used a label template from the internet that was for pantry staples.  I simply inserted a text box over the pantry label  with my own word/font.

I used a label template from the internet that was for pantry staples. I simply inserted a text box over the pantry item with my own word/font.

5)  Other stuff.  Some of my favorite organizing items I added to my bathroom last year.  The first was a tall toilet paper holder.  I love that my daughter can grab a roll when she needs it (no more screams to mommy for more TP) and it keeps it from cluttering up under the bathroom sink.  I also added a Martha Stewart wall file holder with command strips to house magazines and magazine pages for me to peruse while my daughter is bathing or when I am otherwise engaged.  It works because it is off the floor, in an underutilized storage space, and the magazines no longer slide off the top of the toilet!

IMG_5246

Again, not the prettiest pic, but this is what it really looks like. I did have to add a binder clip to the side of the organizer, because the weight of the magazines was pulling it apart. This binder clip solved the problem, though.

I am very happy with the set up in my bathroom now.  Everything has a place that logically makes sense.  It is where I am most likely to reach for it and use it.  Plus, it is pleasant to look at.  In fact, I liked to so much, I did something similar in our other bathroom—which is where I shower.  The shower/tub in our main bathroom houses all my daughter’s bath items and toys, so it is not so much fun to use as an adult.  Though corralled in their own way (inside plastic sand buckets with holes drilled in the bottom for drainage and hung by command hooks), her stuff takes up most of the tub.  Not much room for mommy’s stuff in there–plus our actual shower has a seat, which I like so much better.

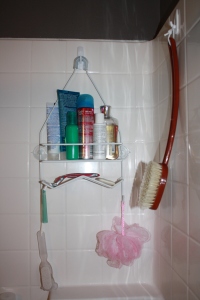
My shower caddy.  His is the same--and to the left of mine.

My shower caddy. His is the same–and to the left of mine.

In our master bathroom, our under sink area features our upstairs cleaning caddy on one side and plastic shoe boxes on the other.  These two shoe boxes hold any extra bathing items—like body wash, shampoo, stick razors, etc.— each box is labeled and one belongs to my husband and one to me.  The top of the counter has another wire basket that holds my husband’s daily use items and another pretty soap holder from Bath and Bodyworks.  In the shower, we used to have all of our shower items on a caddy attached to the shower head—but the weight of the caddy and gravity kept causing problems with the shower head.  Then we moved all the products to little ledges built into the shower, but they were easily and frequently knocked over and shave gel containers would leave rusty marks.  Finally, I figured out I could hang shower caddies from command hooks—not just the shower head.  Duh!  I found two inexpensive caddies at Walmart and it works so much better.  My husband and I each have our own caddy, so there is enough space for both of our items without them being in the way at all.  I am thinking about doing something similar in our bathtub for my daughter’s stuff down the road.

Hopefully these new (and not so new) systems will help keep us organized, on schedule, and beauteous.

1 Comment »

Daily Chore Charts–Version 2.0

I have come to realize that not only my daughter, but me as well, function much much better when we follow a routine.  There are certain chores/goals I want and she needs to accomplish everyday.  I attempted to have us track these daily chores, but found I was going about it the wrong way.  Our charts were abandoned and our routines became very lax.  Changes had to be made.

Last year, I wrote a post about making a cheap and easy chore chart for my daughter with a metal board and magnets.  I had also made myself a chart of sorts in my planner.  These were both systems that worked for us for a while, but I found were not the best for our growing and changing needs.  I have also found that I am a person that likes to have a visual reminder of what I want to get done daily.  And, that I really like to check things of of lists and bask in the wonderfulness of having checked things off of my lists.  My daughter seems to be the same way–poor thing :).

After some soul searching, I realized I needed to make some changes to our daily chore recording routine.  Since I purchased a small table top laminator (more on this soon), I have found out how easy it is to make reusable lists.  All you need is a dry or wet erase marker!  I knew I wanted to make a laminated list for each of us, so I spent a few days examining what I had down in my planner and what I had on the kiddo’s list in her room.  We also discussed our lists together.  I decided to keep a few things, eliminate a few things, and add a few things to each of our lists.  The basic idea is still there, but I feel much more accountable for making sure we both get our daily stuff done since we check off our daily “to do” items daily.

Also, we were tracking our progress day to day.  Once a new day started, the old day was erased–there was no way to compare day to day or look at long term progress.  I decided that a week at a glance would be the best option, because a day was too short and a month frankly took up too much space.  By recording our efforts weekly, if she or I missed an item of our routine…well…routinely, we could identify it and figure out a way to make the process work better.   Since I spent the time to really think about what we needed/wanted to do daily, I knew I didn’t want to eliminate anything or lack of effort or poor time management.  If something was not getting done, we would know to look for a solution.

To create our charts, I simply made tables in word, picked some fun fonts, and added clip art pictures to my daughter’s chart.  My chart is sectioned off by color for chore of the day, morning routine, evening routine, and whenever there is time items.  My goal is to accomplish everything on my list everyday, but I know life happens and will not stress if something must be skipped every once in a while.  (There, I put it in writing, so I must will not stress.)  Hers has each day of the week column as a different color to easily tell the days apart.  She can do almost everything on her list every day.  There are not always dishes or clothes for her to put away, but they are two of her “jobs” and needed to be on her list.  Everything else on her chart is a daily routine item.  We did make  small change to her “jobs” list.  Vacuuming the kitchen floor everyday has been replaced by feeding the cats everyday.  We are both very happy with this change–though the cats still bug me when it’s feeding time.

Once I had the charts figured out, I printed them out in color and zipped them through the laminator.  Instant chore charts!  Hers is now hanging on the pretty metal rectangle where her previous chart used to be, with a dry erase marker hanging from a ribbon right next to it.  (I totally stumbled upon dry erase markers with magnets on the lids!  We now use this attached to her board instead of the one hanging from the ribbon.  I also found mini erasers with magnets at the $1 aisle at Target to hang on her board too).   She uses dry erase, because it is easy for her to make changes.  My chart is on a clipboard and is now stored in the file holder next to my desk space, though I may need a snazzier clipboard someday soon. (I just bought a super cute one at target that is pink with lots of brightly colored flowers!)  I use a wet erase marker–since I actually am more likely to accidentally wipe away my marks–go figure.  I also found I feel less stress, about these new charts because I know they are easily changed if we need to alter our routines for whatever reason.  Simply fix the word document, reprint, and relaminate.  All at home.  Easy peasy.

After a few weeks, I have already noticed that keeping a daily record has kept us more with our routines than we were previously–and as I said before, we function SO MUCH BETTER with routines.  I am amazed at how excited my daughter gets on days when she can check every item off her list–and how willing she is to do some of her daily items just so she can give herself a check mark.  In that regard, she is definitely my girl.  I am hoping these charts will help us keep our routines going long term!

Click on the links below to see our charts!

My Daily Chore Chart

Kiddo Chart

1 Comment »

My New Office Space!

My new office space is wonderful!  I think I finally have all the details how I want them to be, and I absolutely love working here on all types of projects.  My family even takes it over from time to time.  Here’s how it all came about and how it is all organized.  But first, let’s see a before picture.  This is the first day I had my old “new” desk area.  It changed a bit since then, but not much.

Old Desk Photo

You can’t see the bullet holes, because they are covered by a table runner!

The desk itself was a gift from my husband for Mother’s Day.  If you look at the before picture, you will notice I had a very interesting antique desk in my “office”—which is really a wall in our spare bedroom.  (Directly behind my desk chair is the bed, but both have enough clearance when the other is in use.)  This antique is not a family heirloom, so I am not sure why it took me so long to unload it.  One of the sets of neighbors at my mom’s old house were two young-ish brothers who wanted to get rid of an old desk they had lying around.  I thought it was neat looking and snapped it up in an “I’m a broke college student and this desk has character” kind of way.  The desk itself had bullet holes in the top from where the boys would do target practice by putting items on top of the desk in some field at their old homestead.  Yes, folks, I kept a desk with bullet holes, sticky drawers, and a very narrow leg space for about 15 years—moved it 4 or 5 times and even stored it for a while with my dad.  I think I kept hoping I would figure out a way to give it new life.  I had dreams of painting it and making it lovely, but finally realized that was never going to happen, and it really didn’t fit my needs anymore.  It was donated and hopefully off to a new home.  Thus, I needed a new desk.  And, voila!

New desk space!

New desk= new space side view!

IMG_5248

New Desk–Front view!

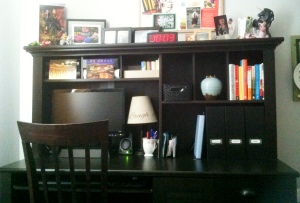
This is a substantial piece of furniture and took way, way, way too long to put together, but it is completely worth it.  It will require burly moving people if it ever needs relocated, however.  After looking at many desks online and finally venturing out to a furniture store, my husband encouraged me to get the one with all the cubbies, so I could do all my organizing stuff.  He knows me so well.  And, after living with it for a few weeks, I think I have the layout down how I’d like, though knowing me it will change as time goes on.

IMG_1356

This is from a few weeks ago. If you look closely, you’ll notice I already moved a few things around and the file hanger hadn’t been installed on the wall yet.  I also get to sit right next to a window which is great, but caused a bit of glare in this pic.

IMG_5256

How it looks as of today…

I did try and take my time and really think about how I wanted things to be organized and what items I needed to purchase to make it all work.  Here’s what I did buy for the space over the past few weeks:

  • Magazine holders.  They actually do hold mostly magazines!  They are from Target, and I am really glad I stumbled across them, because they are exactly what I wanted.  Wide, uniform, and they already came with little label holders on the tall side.
  • A basket for all of my frequently used items like scissors, mini stapler, tape, flash drive bag, etc. (also from Target)
  • Tray for organizing other office materials like markers, paperclips, etc. for top drawer.  The drawer is slightly bigger than 12” x 12”, and I was having a hard time finding something to fit that space.  So, I wandered onto Amazon and found a sturdy clear holder with 3 small compartments and one large compartment—it is perfect.  A piece of scrapbook paper also fits nicely underneath.  Right now, I have a sparkly dark purple paper under there, but I want to find something a little lighter to brighten it up a bit.
  • Hanging file folders for large bottom drawer so I could finally have a home for all of my papers and not in one of accordion file things that never seems big enough.  I decided to be fancy and get the jewel tone ones from Office Depot.  I spent one night in front of the TV sorting all my papers.  It was The Great Purge!
  • A tray from the same office line as the magazine holders at Target.  I turned it upside down to raise my computer monitor a few inches.
  • A small trashcan that fits neatly between the side of the desk and the wall by the window.
Magazine Holders and Small Basket from Target

Magazine Holders and Small Basket from Target

What I reused from the old space:

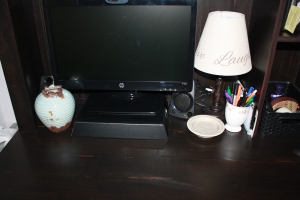
  • A lamp with my favorite saying on it (you’ll find this all over my house).  You can’t see all at once, but I can change it around to fit my mood.
  • Cute teacup to keep some pens at hand.
  • Small sorter for frequently used items like calculator, mini calendar, etc.
  • Gold box to hold boxes of note cards;
  • Wire tray for all must do today items (this may migrate back to my office when school starts up again)
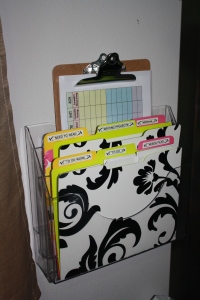
  • Plastic file hanger for the wall near the desk.  I did purchase pretty new patterned folders for $1 for 3 at Walmart to give the space a bit of pizzazz and used my label maker to give them fancy but neatly printed labels.

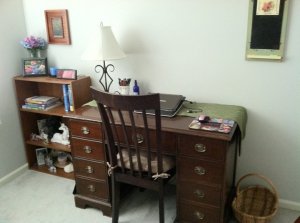
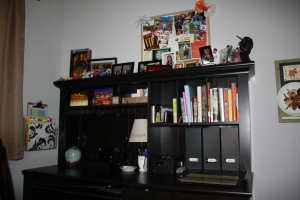
You may notice that the top of the desk has A LOT going on—this is my space to display my pictures, Hunger Games Barbie, inspiration board, and a few other collectibles that are just mine.  The bottom part of the desk is much more subdued with mainly black items and a few splashes of color here and there.  I love that when I’m working, I am not easily distracted by the items that I also really cherish having near me when I work.  The hutch on the desk is tall enough, that I can’t even see what’s on top without stopping and physically looking up.  When I do need a break, they are there to look at, but they don’t pull my attention away when I need to focus.

Calm work space...

Calm work space…

My desk also houses some of my photo books—they are behind the Vegas postcards.  Since they don’t all match, I used the post cards to cover them up and it gives me a warm fuzzy to think about the vacation I took there with my husband.  Those may get moved down the road if I find I need the space for other office related items.  The photo books I make for/of my daughter also are kept in one of the magazine holders.

There are three drawers to the side of the compartment that holds the CPU.  The top drawer holds office supplies; middle drawer the electronic gadgets and paraphernalia like my label maker, i-accessories, and recording devices; and the bottom drawer is for all of my hanging files relating to home and some business.

A peek inside the drawers

A peek inside the drawers

I just added the plastic file folder holder today and LOVE IT!  It not only ties the space together and gives it a little bit of oomph, but it lets me easily get at stuff I need without it getting lost on my desk top or being forgotten in my big file drawer.  I looked for a new one and realized I should just use what I have and save a little money.  The little bit I spent on new folders makes me just as happy as a new holder would.  I use it to house my “to do” folders and it even has a space for my daily check off chart (on the clipboard), which I will hopefully post about soon!

Wall file holder with pretty folders.

Wall file holder with pretty folders.

I am absolutely thrilled with my desk!  It fits my needs perfectly, and I am so glad I didn’t rush into doing everything right at once.  I lived with it for about a month and really thought about what I did here and what I would need to make this space work for me.  And, no bullet holes!  It is just crazy how different the before and after are! (I usually forget to do a before, so I’m excited to be able to post this one.)

Before...

Before…

IMG_5248

After…

1 Comment »

Accountability….or Why I blog…

It has been quite a long time since I have made any posts to this blog.  Some of it has to do with time getting away from me, some with being too exhausted to add one more thing to my plate, and some to do with it falling out of my routine.  When I was posting regularly, I posted on Sunday mornings—a pretty quiet time around my house.  Then, one of my professional responsibilities need to be taken care of Sunday mornings, and the blog slipped by the wayside.

Also, I really needed to take stock of why I was even writing this blog.  Did I plan to become a famous blogger and quit my day job?  No.  Did I intend to share it with people I know?  Did I want others around the web to read and comment on what I write?  Was it just a personal record for me?  I would say, again, a little bit of all of these, but mostly I use this blog to hold myself accountable for the routines and systems I am setting in place.  I know I work best with a routine, and by putting my goals and aspirations into print for all (or more likely very few) to see, I feel like I am required to fulfill them.  I said I was going to do it, therefore I really should.  I guess it is similar to having a workout partner.  You hold each other accountable for going to the gym or walking around the neighborhood, because you don’t want to let the other person down.  This record of my thoughts keeps me focused and determined when sometimes I really am just too darn tired to want to do anything besides crawl in bed and sleep or read a book.

With that in mind, I plan to post every week again my goals and my thoughts on organization, kiddos, and home life.  Whether or not anyone else reads this is really not the point, though if someone stumbled across this blog and found something useful to them, more the better.

Here are just a few of the posts I have planned for the future (again accountability folks!)

  1. What I’ve changed about our routines and systems from previous posts (because really it is a never-ending process)
  2. Why routine (and scheduling) is a must for me
  3. New gadgets and gizmos we’re using around our house
  4. My new home office space!
  5. Fitness Goals and Routines
  6. What I learned from books by professional organizers
  7. I’m starting to help others purge and organize!—and how that all went
  8. Organizing for Road Trips
  9. Setting up a school-agers after school organization routine
  10. The bag lady—how I organize the many bags in my life

According to this, I have 10 weeks of blog posts already worked out in my head.   I may write all of these, I may write only some of these because better ideas might come up.  I may get super excited and post more than once a week.  Either way, I have a plan—and I wrote it down and shared it.  So, NO EXCUSES!

My first new real post should be going up soon (not a Sunday, but you gotta start somewhere).  Happy Organizing All!

Leave a comment »